Friday, January 29, 2010

Vintage Door Headboard


I saw this vintage door listed on Craigslist for $10 and instantly thought headboard. I love vintage doors because they are solid wood, more narrow than today's doors, and I LOVE the symmetrical panels.

I Painted the door with leftover sandy white paint that I had on hand.

I originally painted the panels a taupe color but didn't like the way that turned out. Sooooo, plan B:

I had used fabric from Pottery Barn pillow covers I had laying around. In my dog's rebellious days he got into the pillows and chewed the corners of the fabric. I loved the fabric so much I couldn't part with it, it's been laying around my house for years. I thought the pattern and color would go perfectly in our guest room. After consulting with my fellow Homie friend, Rene, she had the idea of cutting down foam board and gluing the fabric to the board. I thought this looked great but felt it needed something else to frame it off. Enter velvet ribbon. I found this great chocolate brown velvet ribbon for about $2 at Michaels. The ribbon was glued to the fabric to frame the panel. The panels were then glued to the headboard.


There were indents in the side of the door where the hinges once were. To hide this, I purchased a piece of molding, painted it the color of the headboard and liquid nailed it to the top of the door.


Getting the headboard attached to the bed:
Homie Rene suggested to get 1x4s cut down to about 4 ft. in length and screw them into the headboard. I used 3 screws to adhere the top of the headboard to the 1x4s. At the base, lined up the 1x4 to the bed frame, marked where the bolt where going to go. I drilled 2 holes in the 1x4s for the bolts and adhered the 1x4's the bed frame.


The end result:


If you liked this, check out this cool chic's door headboard project

Pottery Barn Taste on a Thrift Store Budget

I love a great Pottery Barn lamp but refuse to pay $100 or more for a lamp. At the local Salvation Army today I found this


Okay, the shade is UGLY but the base of the lamp is heavy and in great shape. The lamp was $8, a good deal, but when I went to the register it was 50% off!!! This lamp cost me a whopping $4! I knew this would look great with help from my friend Mr. Oil Rubbed Bronze spray paint (love this stuff). A few quick coats of spray paint topped off with a lamp shade I had purchased for $14 at Walmart awhile ago and never used and viola!


It looks just like 1 of these Pottery Barn lamps:


The Chelsea lamp $150 for the base $49 for the shade

Sunday, January 24, 2010

Bathroom Updates On A Budget

I'm on a mission to personalize all 3 bathrooms in my home. My goal has been to get framed mirrors, new light fixtures, paint, tile the floors, replace hardware, and install new faucets and shower fixtures. I've been gradually putting the bathrooms together by adding new items whenever I come across a good deal. Here are my bathroom updates so far...

Master Bathroom (my favorite mirror project)


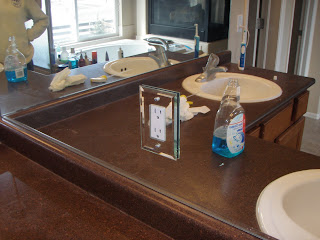
I had the challenge of 2 mirrors and an electrical socket on one of the mirrors so ripping these out was not going to be easy then I ran into this wonderful blog. I love it! The trim was $45 (cost me $5 with my Home Depot gift card). I used oil rubbed bronze spray paint on the trim to match the light fixtures and 2 coats of polyurethane to top it off. A little help from Liquid Nails and, Viola! WAAAAYYY easier than ripping of the mirrors!


Didn't want to mess with this thing


Before
The light fixtures here are replacements for the yucky brushed nickle, swirly frosted glass lights that came with the house (see Jack and Jill bathroom's before picture below). Lights were $52/each from Restoration Hardware Outlet (marked down from $170 each-a STEAL)

Downstairs Main Bathroom


I give credit to my fearless friend, Rene for coming over with a crow bar, gloves and her game face on as she ripped my big glued and taped mirror from the wall. The mirror shattered and we we were ripping pieces of mirror from the wall. Dangerous, I know. It left a few small holes in the wall that I was able to patch with Spackle. The best part? This mirror cost me $30 on Craigslist and was only 1 inch shorter than the mirror that was glued on AND matches the wood tone of my cabinetry. Other steals in this space:

candle lantern $3.00 from Kohls

light fixture $35 from Ebay

frames and pictures $8/each at Michaels

Just scored a chrome $35 faucet at Ace Hardware this week, that will be installed soon.....


I also tiled over the vinyl floors which was one big DIY adventure that I'll save for another post. The tile is 16" glazed porclein and cost $1.60 a square foot on sale. Whole tile project cost about $200.
Before

During

After


Jack and Jill Bathroom


This was done with the help of my dad. He came out for a Christmas visit and I put him to work. Merry Christmas Dad! He took of the old light fixture, patched the drywall and installed another junction box to get these lights in. Lights were $30/each at SmartBargains.com. Mirrors were $25/each at Ross. Towel hooks $3/each at Lowes.


Before.......


I'm planning on tiling the floors in this bathroom and changing out the faucets, but only when I find a good deal!