Saturday, October 23, 2010

$5 Finds

Our master bedroom has been the last room in the house for me to put my personal touch on. I started with this project here then moved on to re-finishing a vintage dresser. The room still needs help. Thanks to Craigslist I was able to furnish the odd corner of the room. First I found a cute little nightstand someone was selling for $5. I re-painted it with ivory colored high gloss spray paint. A few weekends ago I found this awesome chair on Craigslist for $5. That's right $5. What a steal!!!! I was sure there must have been a broken leg or something wrong with it. Nope. It could use new re-upholstery but other than that the chair is in great shape. I figured since I paid next to nothing for the chair I can spend some money on getting it re-upholstered.


I wanted to bring some height to the dresser with some reeds or sticks. I found bamboo sticks on clearance for $3 at Michaels. I spray painted the sticks white, cut them in half with gardening shears and was able to double the amount of sticks I had. I found cylinder glass containers at Ross on clearance for $5 each. I wanted to fill the vases with some cool river rocks but I think paying $5 or more for decorative rocks is a bit ridiculous. I bought a bag of dried black beans for $1.12 at Walmart to fill the vases. I love decorating on the cheap!


I'm still not done. I have a mirror that I purchased years ago for $5 at Walmart. I wanted to frame it with a large thick frame but I'm not sure how I want to tackle that one yet. I would love some kind of unique artwork above the dresser but I haven't decided what that's going to be. In the meantime I have this empty frame hanging up until I find something that strikes my fancy. The white spackling spots also need to be painted over.....someday.


It's come a long from what it used to be

Sunday, October 17, 2010

Kitchen Island Set Back

The kitchen island is now painted and I was all ready for the contractor to install the bamboo plywood.


The contractor brought the plywood to his shop and here are just some of the things he found on the wood.


Fabulous. The wood was packaged between 2 large MDF boards so I thought it was safe from getting any kind of damage. Apparently this damaged happened before the wood was packaged. Soooo I requested my money back on the product which the company obliged to. I think the wood has potential and would be a beautiful piece if it wasn't so damaged. I'm hoping to find another use for it.

On to plan B for the counter top. The contractor suggested other wood suppliers in the area where I could get a similar look and the wood would be better quality, thicker, and for about the same price as the bamboo. I decided to go with a black walnut. This week the contractor is scheduled to come in and complete the task.

It seems like I've waited FOR-EVA for this to be done!

Saturday, September 11, 2010

Island Progress

The kitchen island is well underway. I removed the drawers and cabinet doors and sanded everything down with my orbital sander and 220 grit sandpaper.


Over the Labor Day weekend I got crackin' with painting the island white.

Day1:
Prime the island and cabinets


I used Kilz primer.


I had to put up a dog barrier so no wagging tails touched the island.


Day 2:
Painted the first coat of paint using Valspar semi-gloss latex paint in a creamy white. I applied the paint using a foam roller and paint brush to get into some of the smaller areas.


Dog barrier was in full effect.


Day3:
Painted a 2nd coat of paint on the cabinets. The paint is still uneven and it looks as though there is a texture to the cabinets so I will lightly sand the island and paint a 3rd coat of paint.


For the table legs I purchased unfinished stair newel posts at Lowes for $25/each. These willl be turned upside down and attached to the countertop to resemble table legs. The posts were primed and painted with 2 coats of paint.


Now all I need is the contractor to cut down the chocolate bamboo to size and install the countertop. I can't wait to see the finished product!!

Saturday, August 7, 2010

Refinishing a Vintage Dresser


This has been an eyesore in our bedroom for some time. This was a hand-me-down dresser that was given to us and we have used it for YEARS. I've always hated the look of this dresser and it wasn't able to hold all of our clothes. I've been hunting for a new dresser that was
> Wood
> Mid-century looking
> Had more storage
> Drawers that move in and out smoothly

I knew I could find a dresser for under $100 that with a little TLC I could make new again. I came upon this awesome mid-century, solid wood, long dresser for $40 at the local Goodwill. Bingo! This dresser fit all of my functional needs, I just needed to make the wood darker.


And the results....


Here's how I did it:
1) Remove hardware and wipe down the dresser. I used a damp towel to wipe down the dresser to remove any dust and dirt.

2) Sand it. I used an 80 grit sandpaper and my small Ryobi sander to remove the veneer. I had to get all of the veneer off to get the new stain to soak into the wood. This task took about 4 hours to get the entire dresser sanded down to the wood. It's important to wear a mask when sanding and it's best to do it outside. I did this in my garage and it wasn't ideal and definitely required some help from the shop vac to clean up all the sawdust afterward.

3) Sand it (again). I went back over the dresser with 200 grit sandpaper to finish off the dresser and smooth it out.


4) Wash the dresser. I used a damp cloth again to go back over the dresser and remove any sawdust left on it.


5) Apply a coat of wood conditioner. I used Minwax Pre-Stain Wood Conditioner. The wood conditioner is supposed to help the stain soak into the wood.


Stain should be applied within 2 hours of applying the conditioner.

6) Stain. I used a dark walnut stain in a satin finish for this dresser. I used a product by Minwax called Polyshades. It's a polyurethane and stain in one.

I would recommend using a cheap brush for this. Thoroughly cleaning a paint brush that has stain on it is not easy. Much easier to toss it after using it.

7) Re-stain. I applied a second coat of stain to make it a richer color

My final touches for this piece was to add a metal finish. I used oil rubbed bronze spray paint to paint over the white knobs. I also used the spray paint to cover up the faux marble top.

And because I can't resist a before and after photos


Island Dreaming

I saw this kitchen island picture on HGTV's Rate My Space, it was love at first sight! The butcher block counter top is AWESOME. I have never seen a dark butcher block counter before. I went on the hunt for one but couldn't seem to find any that matched this picture.


Then came Kirei. I found this site after watching an episode of Carter Can where he uses Kirei board to cover the walls. It looked awesome so I had to Google Kirei and I found their other green building products. Low and behold they just came out with a new product...

Chocolate Bamboo


LOVE IT!

I would like to take my current kitchen island


and extend it out by 30" to provide table seating. It would look something like this lovely island I found at myhomeideas.com


I can't decide whether to paint the island cabinets white or leave them as is. Hmmmmm...

Sunday, June 6, 2010

Master Bedroom Facelift


I've been stumped on how to design/decorate/furnish the master bedroom. I really wanted to bring in natural elements and loved the idea of grass cloth wallpaper behind our headboard. The cost of grass cloth and the effort to put it up made me want to come up with a plan b. Here was the plan:

Frame the bed with large fabric panels.
I purchased $5 bi-fold closet doors, much like the ones I purchased for my stairwell art project at my local ReSTORE. I took off the hinges and had 2 panels of wood about 17 inches wide by 70 inches long. I thought I could cover them in a textured fabric, like burlap and mount them to the wall. I found white burlap for $2/yard at a fabric store and purchased 4 yards. I used a staple gun to wrap the fabric around the wood. I attached D rings to the back of the panels and poked monkey hooks into the wall to hang the wood doors.


Change the lighting
I have always loved the Pottery Barn bedrooms with the wall sconces on either side of the bed like this Pottery Barn bedroom


I found 2 brass wall sconces with pleated shades for $10 on Craigslist. I painted over the brass with oil rubbed bronze spray paint ($3 at Walmart) and changed out the lamp shades for $10 linen shades I found at Target.


I mounted the lamps to fabric covered wood boards and had new lighting for $30.


Add wall art
I love the look of having a big piece of art over the bed. I had a mirror that I used over the dresser and I decided to put that between the wood boards.

And the end result:


Total cost for this project was about $40.

D Rings and Monkey Hooks Saved My Marriage

I love to hang big heavy mirrors and large wall art throughout my home. Unfortunately for the Hubs, he has to help me hang these items which he is never happy about.

I was at Lowes looking for mounting hardware for the new mirror I bought for our downstairs bathroom when a Lowes associate told me about monkey hooks. These hooks poke into the wall. That's right, I said POKE. Not drilled, hammered, or screwed into stud but POKED into the wall. D rings can easily be screwed into any item and then hung from the monkey hook. Monkey hooks come in different sizes to hang items from 25 lbs. to 100 lbs. The mirror for our downstairs bathroom already had D rings on it so after measuring where to place the monkey hooks I had Hubs help me place the D rings on the hooks and VIOLA, a hung mirror AND a happy husband.


I used D rings and monkey hooks for all of these projects:

large wall art in our hallway


$5 stairwell wall art


Wood panels by our bed as well as the large mirror


Jack and Jill bathroom mirrors


TAKE NOTE: Monkey hooks cannot be placed into a stud!

$5 Wall Art

I wanted some large, unique wall art to go on my stairwell. I stopped by my local ReSTORE, which sells discounted building materials and helps support Habitat for Humanity. I found plain, bi-fold closet doors for $5 each. The doors looked like plain wood art panels that could be used for anything so why not paint them?


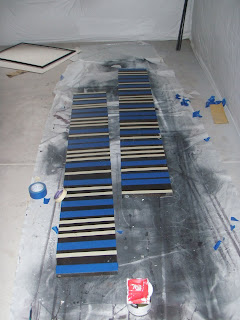
I used 2 dark wood panels that were about 12"x70" long, took of the hinges. I used painters tape to tape off different patterns.


I settled on doing stripes. I used painters tape and masking tape to get 2 different stripe widths and used 2 different neutral paint colors I had left over from another project.


To attach the panels to the wall I screwed in D rings and attached them to monkey hooks.

And the end result:


See another project with bi-fold closet doors here.

Thursday, February 18, 2010

Home Tour

I'm attending a Home Tour Party hosted by Transforming Home


Welcome to Home-EE's Home Tour!

Front Room
First room you enter when you come through the front door. Accessorized with my lab, Lucy and her kennel. I'm on the hunt for the perfect rug to go in this room as well as a nice storage ottoman.


Dining Room
Faux painted the walls with a rag on technique. I've lived with it for a few years,and I'm thinking the walls need a different paint color.


Family Room
Decorated with many family photos! Who doesn't love a great photo wall?


Kitchen
I love the layout of the kitchen but one day home to extend out my island for extra seating, install quartz countertops, and put in a backsplash. One day....


Downstairs/Main Bathroom
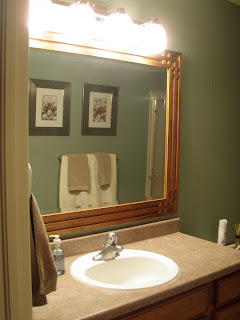
This bathroom got a big makeover with painted walls, new mirror (purchased on Craigslist for $30), new lighting fixture and tile. Next is to replace the faucet with a chrome 2 handle faucet which I've purchased but haven't installed yet.


Guest Bedroom
This room is furnished by Craigslist. The headboard was a DIY project. The end tables (which were painted cream) and lamps were purchased as a set for $40.


Jack and Jill Bathroom
The glued on wall mirror was ripped out and replaced with the 2 framed mirrors and 2 new lighting fixtures with the help of free labor from good ol' Dad. Next up is to replace the faucets and tile over the vinyl flooring.


My Home Office
This room doubles as a guest bedroom and is another Craigslist furnished room. Futon was $50 and desk was $25. The large wall art over the futon was inspired from this Myles of Style episode.


Master Bedroom and Bathroom
I love the layout of our bedroom and bathroom. I framed the mirrors in the bathroom with trim board and installed 2 new light fixtures. I'm in the process of getting estimates to have tile installed on the floors and replace the tile in the shower and tub, which is very builder beige blah! I would love to tile the fireplace as well.
As for the bedroom, I'm still looking for the perfect art piece(s) to place over the bed and maybe new nightstands.